

As I have stated elsewhere, I did not buy this car because it is a Ford, or a Mustang, or a 66 Mustang or even because it is a 66 Mustang convertible. I bought it because it is a 66 Vintage Burgundy, Black Interior with Black Trim, 289 4 BBL, 4-speed, Convertible Mustang . This is  exactly the car I owned back it college. I would not have wasted my time on anything else.
The car actually differed from these specs in a couple of ways. First it is a GT, a good thing, and it has a Rally Pac, another good thing. However, at the time I purchased it, the interior had been converted to Parchment with Luxury Burgundy Trim. When I first saw pictures of the car, I was put off with the ratty looking Parchment/Burgundy interior. However, there was also a picture of the data plate and, when I decoded the numbers, I learned that it had actually begun life with a Black interior. (This was not the first 66 Burgundy 289 Mustang Convertible that I had seen on the Internet. However, when I decoded their data plate, I learned that they had begun as something quite different. One was originally a 6 cylinder automatic. Not what I was looking for.)
Once I got it home I assessed the car’s current condition and made a tentative plan for taking it where I wanted it.
Item 1 - Paint. It appeared to have the original acrylic enamel paint. Unfortunately, 50 years had not been kind. It was bubbling, cracking and peeling, and, much as I hated it, I had to repaint it. Quite costly since it had to be stripped down to the metal. This was completed about a month later.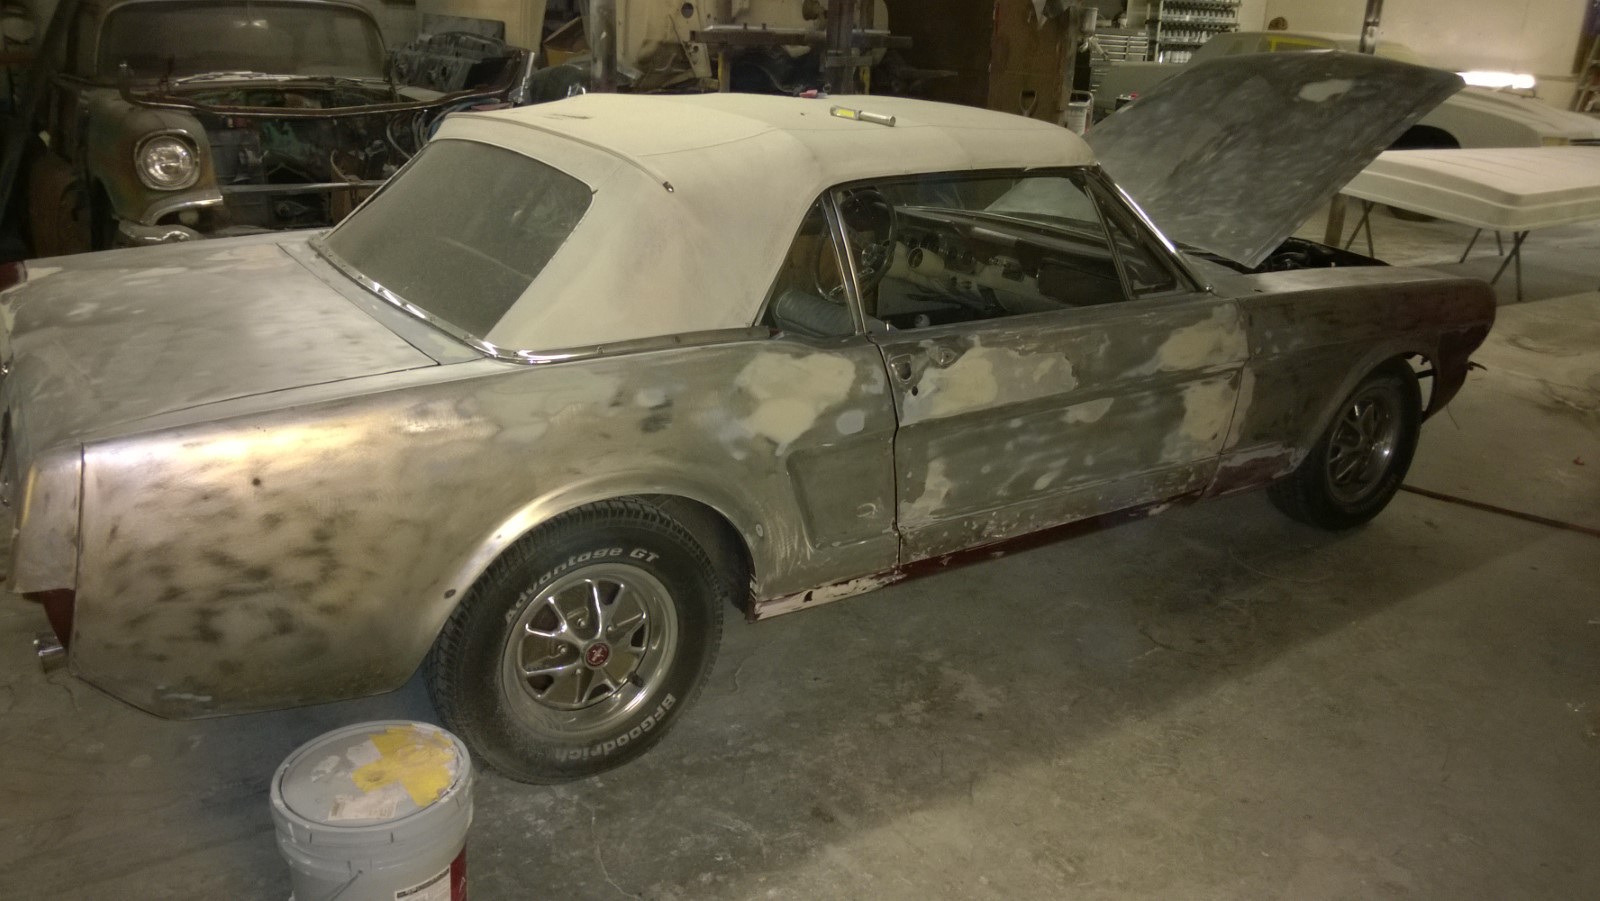
Item 2 - Top frame and top replacement, interior replacement. Unfortunately, the top frame, after 50 years, was sagging, loose and rusty and needed replacing along with the rag top. At the same time I had the ratty interior replaced with a proper black interior. I couldn’t help but upgrade it to the luxury (pony) interior. This project was complicated by the ill fit of the aftermarket roof frame. This remains a problem to be reckoned with at a future date.
Item 3 - Power steering, power brakes and AC. I had not driven a car without power steering probably since I sold my original Mustang back in 76. The day I test drove it I knew I would have to remedy this. And while the GT has front disc brakes, I am not sure I could lock them up if I had to. And for the trifecta, the heater was bum so I decided to add a combo AC/Heater unit.
I found a mechanic who agreed to install all three. He got the power steering installed and the AC compressor. As part of the power steering installation he replaced the steering column with an Ididit column with tilt wheel. (Unfortunately, I found out later that the Ididit would not accommodate my Rally Pac and had to can it.) He could not find a power brake unit that could be installed without modifying the shock tower, something that neither of us wanted. So I dropped the power brakes.
After keeping the car a month or more, we finally decided that I would take the car back until he worked off a few projects that were conflicting with mine. This was in the fall of 2017. So not only had I gone without AC in the summer, I would not have heat in the winter. Finally, in May of this year, we agreed that I would retrieve the parts he had and find someone else to complete the project.-2.jpg)
The AC was completed the end of August. The power brakes will be reassessed and addressed at a future date.
Item 4 - Rewiring. As I noted elsewhere, the main wiring harness under the dash was a rat’s nest of brittle insulation, twisted connections and electrical tape. So I decided to have the following wiring harnesses replaced - the main harness, the lighting and instrument/ignition wiring harnesses (both under the hood), the rear harness and the fog light harness. For the new main harness, I selected the CJ Classics Under Dash Wiring Harness With Premium Fuse Box and Relays. This harness is identical to the classic harness with the exception that the original five cartridge fuse box has been replaced with a 12 space blade fuse block. And it includes two relays to take the load off of the ignition switch circuit and the auxiliary circuit.
I did the under hood harnesses with the help of my brother. The remaining harnesses were installed along with the AC by a local restorer. All of this was completed by the end of August.
Item 5 - The Rally Pac. The Rally Pac had two major problems - it had been painted parchment and the clock didn’t work. I first addressed the clock.  The problem is usually associated with the electrical points that close to wind the spring. Often cleaning the points with some emery paper will cure the problem. However, when I removed the movement, half of the points fell out on the table thus rendering the clock unfixable. The next level fix was a $160 movement replacement.
However, I decided to take a different approach. I bought a $15 battery operated movement off of Amazon. Unfortunately, it does not appear to be available on Amazon, but you can buy it directly from the manufacturer, Ronell Clock Company (model No MCN-24M). Don’t forget to add some hands. Get a pair with long straight section and cut it to fit. If you are careful, you might be able to reuse the original hands. After demolishing the broken clock movement, I mounted the new unit using double stick tape. I then rigged a remote battery holder so that I could replace dead batteries without going back into the Rally Pack. Unfortunately, if the clock time gets off, the entire Rally Pac will have to be removed and the clock broken down to get to the adjustment knob. Recognizing that even a dead clock is correct twice a day, I elected to disconnect the battery until the time is correct. I eventually added a toggle switch so that I wouldn’t actually have to pull the battery. (I'm looking into a rechargeable systems to keep the clock energized 24/7.)
A note: I elected to go with the battery rather than connect the clock to the car battery. First you will need a regulator to buck the voltage down to the clock voltage. And secondly, I disconnect the battery when the car sits for extended time unused or when I am doing electrical work on it.
While I had the clock removed, I also removed the tach, stripped the old paint and repainted it black. I purchased new plastic lenses and wiring and now have a Rally Pac that matches the new black interior.
The Rally Pac was installed the first of October.
Item 6 - 4-Speed Shifter. Somewhere in its 50+ years, the original shifter had been replaced with a perfectly good working Hurst shifter. This was understandable as the original Ford shifters were notorious for their wear and, over time, becoming very loose and floppy. 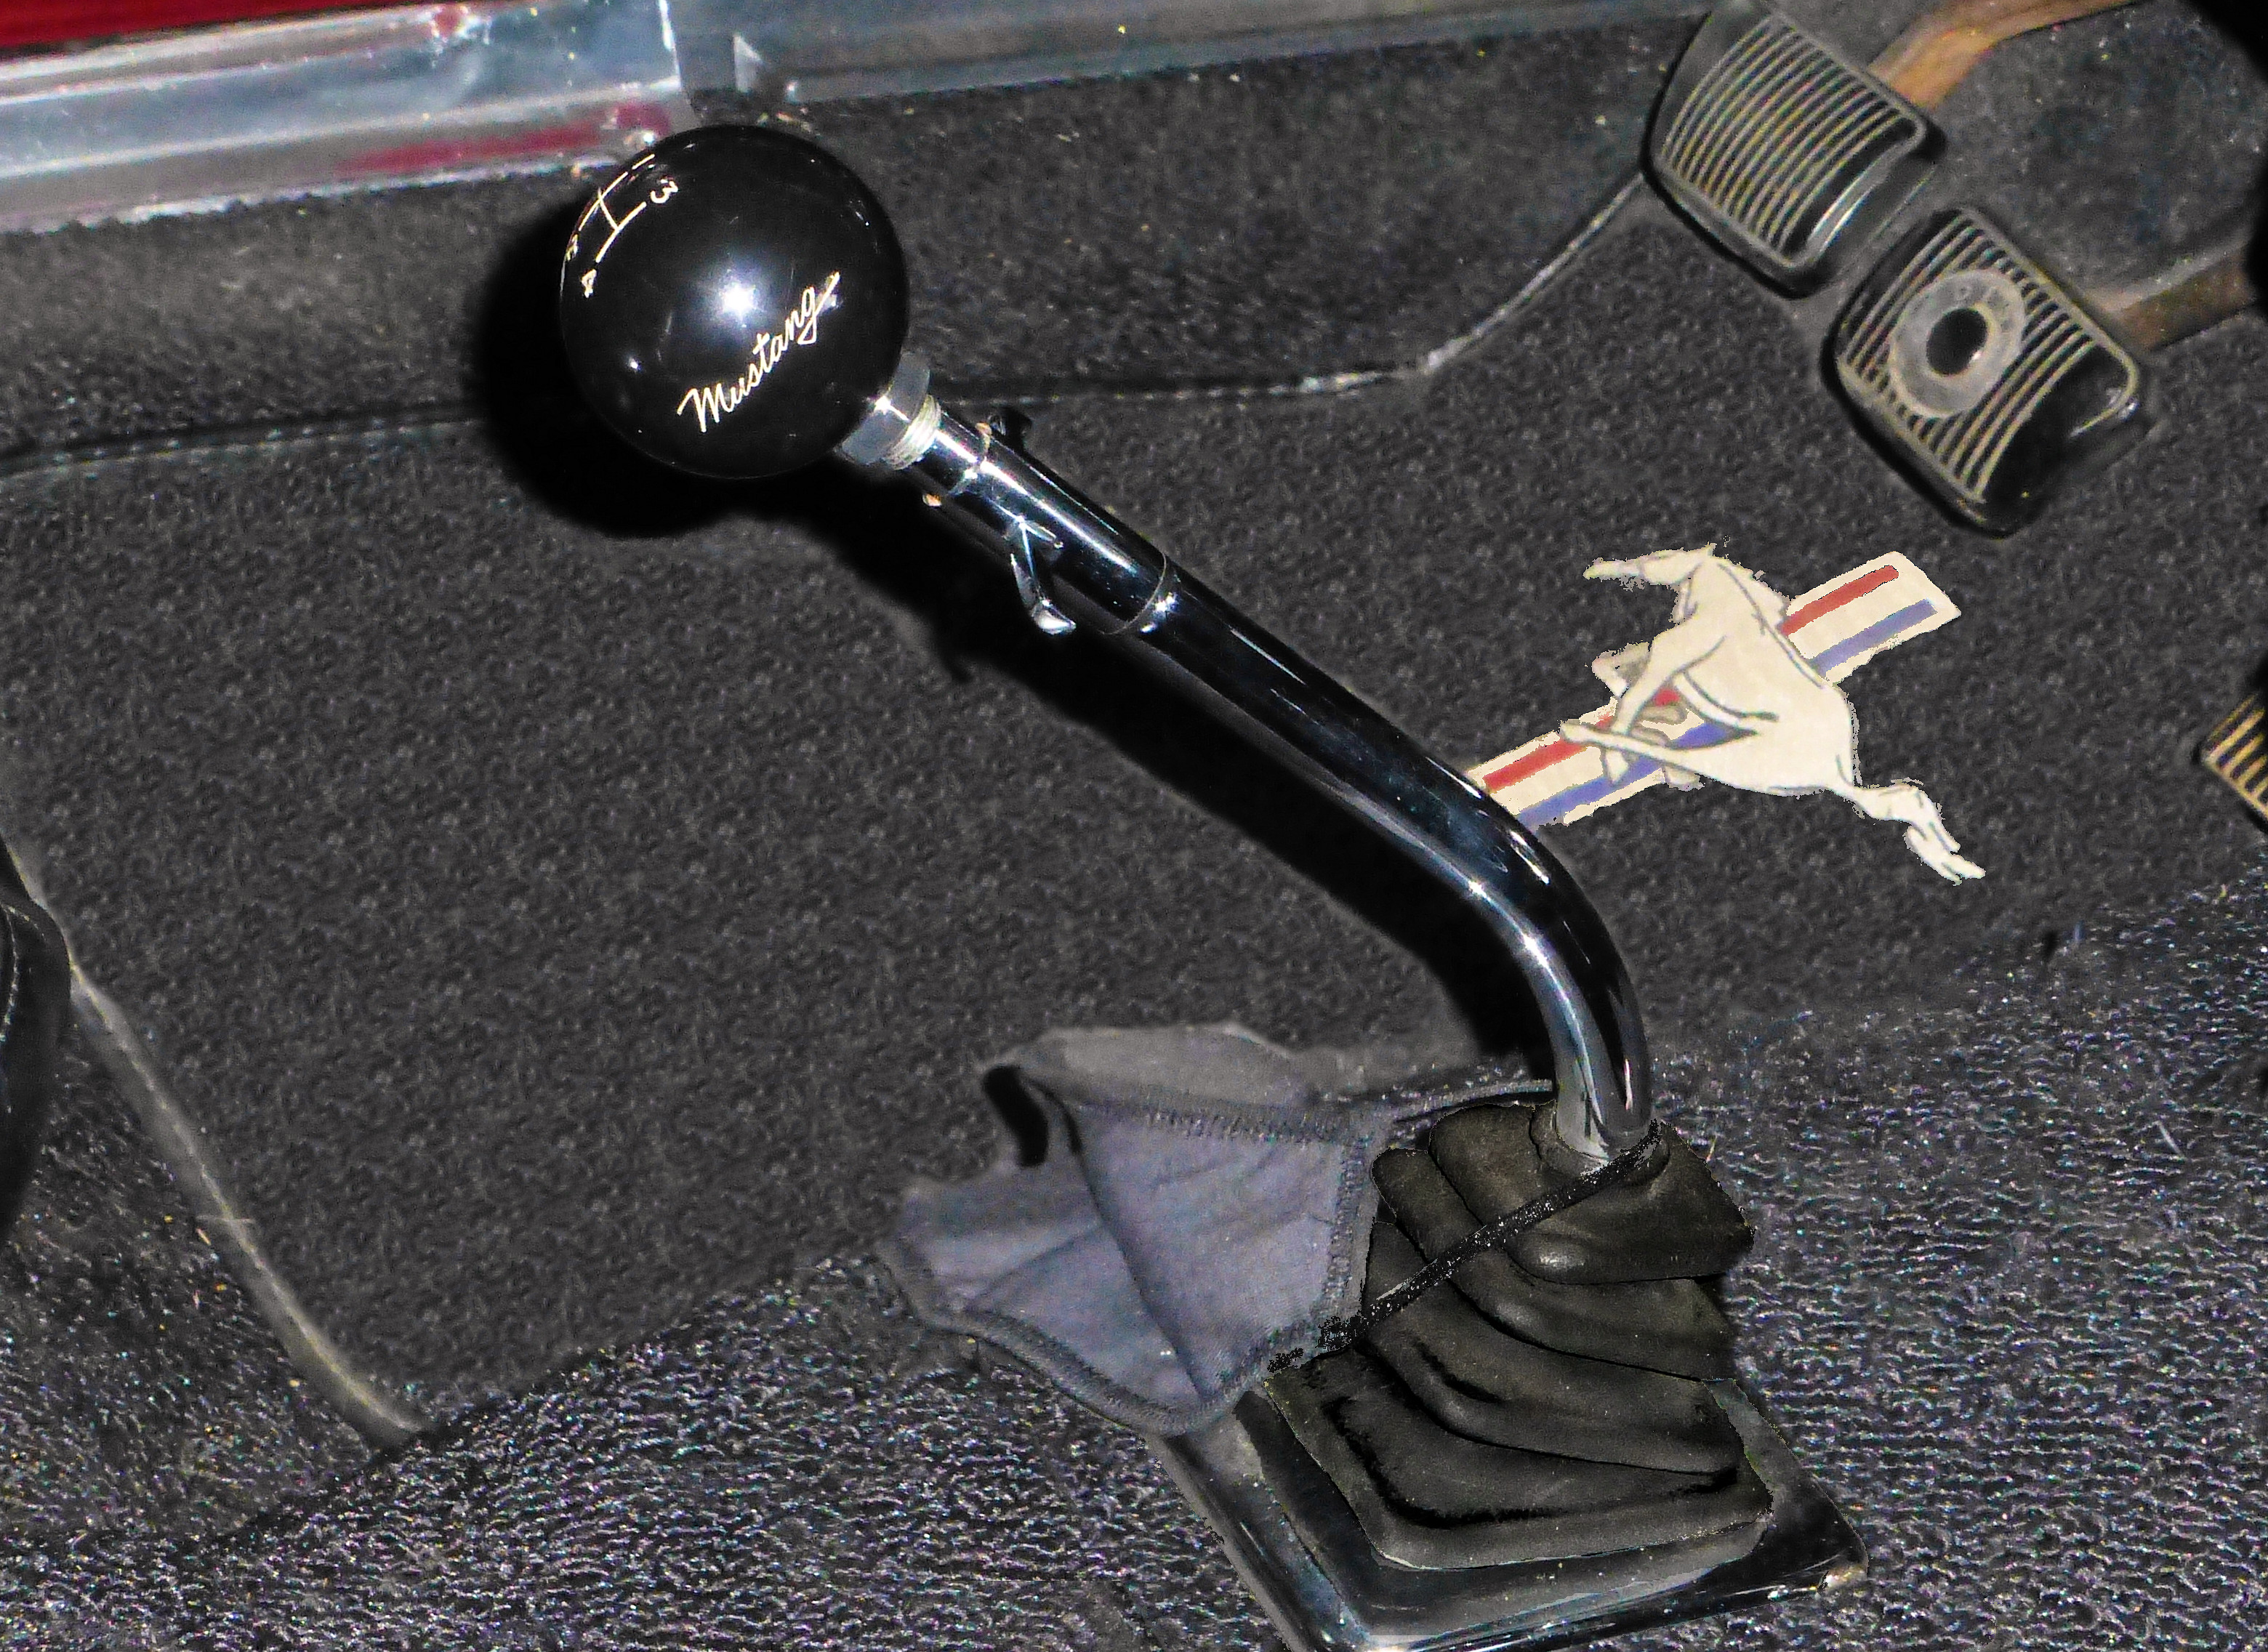 However, the Hurst shifter had two glaring problems -
 reverse gear was to the left and UP with no manual lockout (not a real problem but then the lady behind me at the traffic light probably didn’t agree when I hastily shifted from neutral to first and hit reverse instead - no collision but her horn was loud) and, secondly, it was not an original shifter.
I searched the Internet extensively and one name kept popping up - Bill Neeley of Olney, MD. It turns out that Bill is the guru of Ford toploader shifters and he specializes in rebuilding old shifters to better that factory new condition. The consensus was that his rebuilt shifter was far superior to the Hurst shifter then on the Mustang. I called and eventually purchased one of his shifters. His price is set and some might find it excessive, but I’ve never shied from paying for quality. And I can assure you of the quality - it shifts smooth as silk. You can save if you have a used shifter that can be rebuilt. He can even convert a 3-speed shifter to a 4-speed. But then, I got about half of the cost back selling the Hurst shifter.
I hesitate to put his contact information here, but if you Google him, you will find multiple references with his phone number. I now have an original shifter with reverse to the left and DOWN (as God intended) included the t-bar lockout. I’m a much happier Mustang owner.
Item 7 - Holley Sniper EFI. It started as a simple task. I put the Mustang in the shop to replace the fuel gage sending unit. When they couldn't get the old sending unit loose from the tank, I decided to replace the 50+ year old tank. Then I thought that maybe this would be a good time to put in electronic fuel injection (EFI).
Holley makes a unit that directly replaces the 4bbl carb so it wouldn't be obvious without removing the air filter. I had been contemplating this for some time. My thoughts went along this line: I purchased the Mustang with a Holley 4 barrel carberator which was one of the reasons I purchased it. It required continual adjustment, even after putting a rebuild kit in it. I finally replaced it with a brand new Holley 4150. Even the new one continued to run rich and would not stay in adjustment. The engine would sputter when I accelerated at a low speed in second gear. I switched to 100% (ethanol free) gasoline which helped it immensely. However, in the year of Covid, I did not look forward to going in the local 7-11 to stand in line and pay at the counter. I finally located pay at the pump ethanol free but it wasn’t exactly handy. I wanted to keep the Mustang as original as possible, but given the driveability of the car and the fact that the Holley unit was practically unnoticeable, I decided to proceed.
The EFI can be ordered as part of a kit that includes a fuel pump, filter, high pressure fuel hoses and various part and pieces for a complete installation (Holley 550-511K 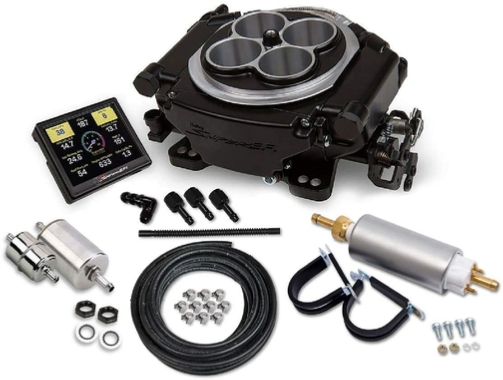 Sniper EFI Self-
Tuning Master Kit, $1300). (This turned out to be mistake. I will cover my mistakes in detail at the end of this project.) As it turned out, it appears that, with folks out of work due to the Covid, everyone in the US of A was installing one of these units and it had a 2-4 week delivery time, even from the manufacturer. However, I was able to find one on Amazon (of course) in stock with 2 day delivery. It actually came from Speedway Motors out of Lincoln, Nebraska. Though this offered some shipping delays, it turned out to be a fortunate turn of events (see below).
Next I had to find someone to do the installation. (10-15 years ago, I might have taken this on myself, but time and an deteriorating body precludes me for crawling under cars and into engine bays.) I had used a local mechanic that I trusted and had given me good service. However, after the Covid hit, he cut back his business to 3 days a week and had more than he could handle. My next choice was a local shop that had done some front end alignment and suspension work. I asked if they could do the work (I sent them a link to the web page) and, of course, they said “Sure, no problem.” “So”, I said, “go ahead.” Mistake #2.
On the first installation, they could not get the EFI set up and, after speaking with Holley, determined it was a bad unit. I got back directly with Speedway and, working with Scott Angell, they agreed to replace it. However, I needed to expedite the replacement and offered to purchase another one and then send back the bad unit for a refund after it had been changed out. This was agreeable with Speedway and they shipped another one 2-day delivery. After replacing the old unit, it seemed to be working better but it had a problem retaining the EFI settings.
I then called the local Holley distributor and they told me that James Grey had installed over a dozen of these and probably knew more about these units than anyone in the area. As it happens, James had done some of the initial mechanical work on the Mustang so I gave him a call. (James is actually a Chevy guy and he told me he regretted taking on my original project. I said that I would not bring it back. He grinned, we shook hands and parted on very amicable terms.) He pointed out that my problem was probably RFI (radio frequency interference) from the old distributor and suggested that I replace it with a new Holley electronic distributor. (I’ll call this mistake #3, though it did solve the problem.)
So I purchase a Holley HyperSpark Distributor and Hyperspark Ignition Coil (Summit Racing Equipment, $290). This required a Hyperspark Ignition box ($200). The Distributor turned out to be DOA and had to be replaced.
After replacing the entire ignition system, problems still continued and once again Holley diagnosed the problem (over the phone) as a dead EFI. And once again Speedway shipped (sold) me a third unit. At this point I still had the original and first replacement units. Speedway’s instructions were to wait until everything was installed and working and then return the two EFI bodies and any parts that I didn’t use. (Speedway was very accommodating and was one of the few good things in this build. I will certainly look at them in the future. Eventually I boxed up all of the unused parts, shipped them back and, in a reasonable time got refunds from Speedway and Amazon.)
Finally, I picked the Mustang up the middle of July and forked out $1500. (I’ll give them props for not charging me their actual cost. I would estimate it to be perhaps twice what I paid). Unfortunately, I didn’t get a half mile down the road before I detected a fuel smell and returned it to them. They checked it over and diagnosed it as a rotten fuel filler cap gasket. I ordered a replacement from Amazon and, unfortunately, it did not fix the problem.
Having lost confidence in that shop, I decided to take it to another to have the fuel leak fixed. I also was concerned about the mods to the electric system and wanted to have it gone over. After calling around, a found a local shop, Tom’s Auto Clinic. Tom himself said that he had a man a that was “the best auto electric man in the area!” (Mistake #4!) I asked them to fix the fuel problem and check over the EFI installation, especially the electrical. This set me back another $1400 and a week and a half.
After getting it back, my brother and I took it for a cruise and, in the middle of downtown Knoxville, it decided to go dead. I realized that I wasn’t hearing the fuel pump running. Apparently it started back up and we started home when it went out again. Fortunately, we were on a down hill slope and were able to coast into a parking lot. On the theory that the pump was defective and overheated, we waited 10-15 minutes.  It restarted and we were able to drive back home.
Having regretted getting the external fuel pump that came in the kit because of the noise and also being concerned that the pump was defective, I decided to replace the external pump with an internal one. Of course Holley has such for the price of $315. I ordered it. I also noted that the fuel smell was still lingering, particularly strong in the trunk. I then called Tom (reluctantly) and told him I was still having a fuel leak problem and that I would also like to have the new fuel pump installed. I also told him that I was having a problem with the battery discharging in just a few days. One week and $800 later, I picked the Mustang up. Tom’s man informed me that I had a major electrical problem. He described it that the body of the car was energized at 12 volts. I never understood what he meant nor how such could happen since the body was grounded to the battery ground. At this point, I forked over my money and got the hell out of there. Driving home I discovered that my turn signal dash indicators didn't work, my radio didn't work and the temperature sending unit didn't work. I still wonder to this day not only why the "guru" didn't fix the “energized” problem, but also left me with all new problems. Perhaps his reputation exceeds ability? On the positive side, he found and fixed the fuel leak. (Turns out the fuel return line wasn’t sealed properly.) But I also discovered later that the driver’s side rear window had mysteriously jumped the track. I’ll not be going back to Tom’s Auto Hell.
At this point, I called Glenn, who had originally done the rewiring (see Item 4 above). Though busy, he agreed to take on the “major” electrical problem as well as the other problems that had popped up. He had it a couple of weeks (he had done me a favor working on it at night between his other projects.) Turns out the “major” electrical problem was a stuck glove box switch that kept the glove box light on. The other problems were minor and he corrected them. (I’m still wondering how the turn signal lights got plugged into the wrong holes in the panel.)
This left two problems that needed resolving. It had suffered from a high idle setting since I got it back from Tom’s. It was hovering around 1000-1100 rpms which was not helpful when gearing down and embarrassing when stopped. I had tried changing the idle setting in the handheld monitor to no avail. I ignored it until, after buying gas and restarting the car, the idle ran up to 2500 rpm and would not go down. I nursed it home and place a call to Holley which put me in touch with Mr. Personallity who pointed me toward the IAC (Idle Air Control) setting. However, his description for the fix was not very detailed. Nor was the Instruction Manual particularly helpful. (In fact, it kept referring me to the Throttle Plate Setting section which I never found.) However, I did find the following video on YouTube - https://www.youtube.com/watch?v=j5Wz_RoXVSI. Following their instructions, I now have the idle under control
The remaining problem was one that had plagued me since the original installation. It was suffering from what I have come to learn is “aggressive tip in”.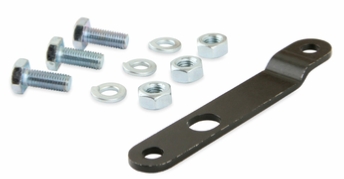 When accelerating from stop or when depressing the accelerator while coasting, the throttle would seem to stick and then the car would lurch. Truthfully, I considered pulling the EFI and replacing the carburetor because of this. I asked a Holley tech about this months ago. He seemed rather stumped. I raised this again to a Holley tech just a few weeks ago. He suggested a change in one of the settings through the handheld. (I forget which one, but it didn’t work anyway.) If that didn’t work, he suggested I install a Throttle Extension, a short metal bracket complete with 3 bolts, lock washers and nuts ($13 from Holley or $20 from Amazon, but with free 2 day delivery and free return). This bracket bolts directly to the throttle lever “increasing the mechanical advantage of your throttle cable, or rod. Resulting in a significantly decreased pedal effort, and smoother pedal feel, especially at tip-
in or low throttle input, such as when you are leaving a stoplight.” Sounded very familiar. To install this, the two holes to the upper right of the bracket (refer to the picture) match existing holes in the throttle bracket that two of the bolts poke through. The offset hole goes to the bottom. (You will not have to unbolt anything from the EFI. I couldn’t get the nut on the back of the bottom bolt so had to poke the bolt in from the EFI body side with the nut toward me.) The throttle rod sticks into the hole on the bottom left of the picture. I had to let the throttle linkage out to compensate for the angle of the bracket. (The clue was when I restarted the Mustang and the revs kept going up.) Honestly, the accelerator now works like it did before the conversion. (BTW, I didn’t use the 3rd bolt and nut. It must be necessary to connect the throttle rod on some cars.)
With the EFI properly set up and with the addition of the throttle extension, the Mustang now runs better than anytime since I have had it. I can let the clutch out on a hill to hold the position without having to “heel” the accelerator. If I tried this with the carburetor, I had a 50/50 chance of stalling. The bottom line - I don’t know if I would do it again, but now that it’s done, it’s a definite improvement.
Now for the Mistakes:
exactly the car I owned back it college. I would not have wasted my time on anything else.
The car actually differed from these specs in a couple of ways. First it is a GT, a good thing, and it has a Rally Pac, another good thing. However, at the time I purchased it, the interior had been converted to Parchment with Luxury Burgundy Trim. When I first saw pictures of the car, I was put off with the ratty looking Parchment/Burgundy interior. However, there was also a picture of the data plate and, when I decoded the numbers, I learned that it had actually begun life with a Black interior. (This was not the first 66 Burgundy 289 Mustang Convertible that I had seen on the Internet. However, when I decoded their data plate, I learned that they had begun as something quite different. One was originally a 6 cylinder automatic. Not what I was looking for.)
Once I got it home I assessed the car’s current condition and made a tentative plan for taking it where I wanted it.
Item 1 -
Item 2 -
Item 3 -
I found a mechanic who agreed to install all three. He got the power steering installed and the AC compressor. As part of the power steering installation he replaced the steering column with an Ididit column with tilt wheel. (Unfortunately, I found out later that the Ididit would not accommodate my Rally Pac and had to can it.) He could not find a power brake unit that could be installed without modifying the shock tower, something that neither of us wanted. So I dropped the power brakes.
After keeping the car a month or more, we finally decided that I would take the car back until he worked off a few projects that were conflicting with mine. This was in the fall of 2017. So not only had I gone without AC in the summer, I would not have heat in the winter. Finally, in May of this year, we agreed that I would retrieve the parts he had and find someone else to complete the project.
The AC was completed the end of August. The power brakes will be reassessed and addressed at a future date.
Item 4 -
I did the under hood harnesses with the help of my brother. The remaining harnesses were installed along with the AC by a local restorer. All of this was completed by the end of August.
Item 5 -
The problem is usually associated with the electrical points that close to wind the spring. Often cleaning the points with some emery paper will cure the problem. However, when I removed the movement, half of the points fell out on the table thus rendering the clock unfixable. The next level fix was a $160 movement replacement.
However, I decided to take a different approach. I bought a $15 battery operated movement off of Amazon. Unfortunately, it does not appear to be available on Amazon, but you can buy it directly from the manufacturer, Ronell Clock Company (model No MCN-24M). Don’t forget to add some hands. Get a pair with long straight section and cut it to fit. If you are careful, you might be able to reuse the original hands. After demolishing the broken clock movement, I mounted the new unit using double stick tape. I then rigged a remote battery holder so that I could replace dead batteries without going back into the Rally Pack. Unfortunately, if the clock time gets off, the entire Rally Pac will have to be removed and the clock broken down to get to the adjustment knob. Recognizing that even a dead clock is correct twice a day, I elected to disconnect the battery until the time is correct. I eventually added a toggle switch so that I wouldn’t actually have to pull the battery. (I'm looking into a rechargeable systems to keep the clock energized 24/7.)
A note: I elected to go with the battery rather than connect the clock to the car battery. First you will need a regulator to buck the voltage down to the clock voltage. And secondly, I disconnect the battery when the car sits for extended time unused or when I am doing electrical work on it.
While I had the clock removed, I also removed the tach, stripped the old paint and repainted it black. I purchased new plastic lenses and wiring and now have a Rally Pac that matches the new black interior.
The Rally Pac was installed the first of October.
Item 6 -
However, the Hurst shifter had two glaring problems -I searched the Internet extensively and one name kept popping up -
I hesitate to put his contact information here, but if you Google him, you will find multiple references with his phone number. I now have an original shifter with reverse to the left and DOWN (as God intended) included the t-
Item 7 -
UPDATE ON THE HOLLEY SNIPER EFI - After screwing around with this thing for over two years, it's time to consign it to the scrap heap of DEAD PROJECTS! It's not that I didn't want it to work. And it's certainly not because I continued to throw money at it with hopes that it would actually live up to its potential. No, it finally got to the point that I did not trust it to enough to drive it on the mountain roads of East Tennessee. This past summer I have not had it out of the garage a half dozen times. The main problem that I encountered was that the idle would decide to jump from 900-1000rpms to 1800-2200rpms! Try gearing down when coming to a stop and, instead, speeding up. And I have to clutch it when I take my foot off of the accelerator.
The one feature that I really like is the touch screen monitor. I guess it's the digital thing. Enginestat offers a digital monitor that appears to be fairly simple to install for only $330. To check it out click here.
So I will be removing the following equipment and reinstalling the Holley 4bbl carb and the original distributor and coil. If you are interested in purchasing the EFI or any of the following, please click the Contact Me button below.
- Holley Sniper Master Kit (prt #550-511K)
- Holley In-Fuel Tank Pump (prt #12-305)
- Holley Sniper EFI Hyperspark Distributor (prt #565-301)
- Holley Sniper EFI Hyperspark EFI Ignition Box (prt #556-151)
- MSD Tach Adapter (prt #8910)
Holley makes a unit that directly replaces the 4bbl carb so it wouldn't be obvious without removing the air filter. I had been contemplating this for some time. My thoughts went along this line: I purchased the Mustang with a Holley 4 barrel carberator which was one of the reasons I purchased it. It required continual adjustment, even after putting a rebuild kit in it. I finally replaced it with a brand new Holley 4150. Even the new one continued to run rich and would not stay in adjustment. The engine would sputter when I accelerated at a low speed in second gear. I switched to 100% (ethanol free) gasoline which helped it immensely. However, in the year of Covid, I did not look forward to going in the local 7-
The EFI can be ordered as part of a kit that includes a fuel pump, filter, high pressure fuel hoses and various part and pieces for a complete installation (Holley 550-
Sniper EFI Self-Next I had to find someone to do the installation. (10-
On the first installation, they could not get the EFI set up and, after speaking with Holley, determined it was a bad unit. I got back directly with Speedway and, working with Scott Angell, they agreed to replace it. However, I needed to expedite the replacement and offered to purchase another one and then send back the bad unit for a refund after it had been changed out. This was agreeable with Speedway and they shipped another one 2-
I then called the local Holley distributor and they told me that James Grey had installed over a dozen of these and probably knew more about these units than anyone in the area. As it happens, James had done some of the initial mechanical work on the Mustang so I gave him a call. (James is actually a Chevy guy and he told me he regretted taking on my original project. I said that I would not bring it back. He grinned, we shook hands and parted on very amicable terms.) He pointed out that my problem was probably RFI (radio frequency interference) from the old distributor and suggested that I replace it with a new Holley electronic distributor. (I’ll call this mistake #3, though it did solve the problem.)
So I purchase a Holley HyperSpark Distributor and Hyperspark Ignition Coil (Summit Racing Equipment, $290). This required a Hyperspark Ignition box ($200). The Distributor turned out to be DOA and had to be replaced.
After replacing the entire ignition system, problems still continued and once again Holley diagnosed the problem (over the phone) as a dead EFI. And once again Speedway shipped (sold) me a third unit. At this point I still had the original and first replacement units. Speedway’s instructions were to wait until everything was installed and working and then return the two EFI bodies and any parts that I didn’t use. (Speedway was very accommodating and was one of the few good things in this build. I will certainly look at them in the future. Eventually I boxed up all of the unused parts, shipped them back and, in a reasonable time got refunds from Speedway and Amazon.)
Finally, I picked the Mustang up the middle of July and forked out $1500. (I’ll give them props for not charging me their actual cost. I would estimate it to be perhaps twice what I paid). Unfortunately, I didn’t get a half mile down the road before I detected a fuel smell and returned it to them. They checked it over and diagnosed it as a rotten fuel filler cap gasket. I ordered a replacement from Amazon and, unfortunately, it did not fix the problem.
Having lost confidence in that shop, I decided to take it to another to have the fuel leak fixed. I also was concerned about the mods to the electric system and wanted to have it gone over. After calling around, a found a local shop, Tom’s Auto Clinic. Tom himself said that he had a man a that was “the best auto electric man in the area!” (Mistake #4!) I asked them to fix the fuel problem and check over the EFI installation, especially the electrical. This set me back another $1400 and a week and a half.
After getting it back, my brother and I took it for a cruise and, in the middle of downtown Knoxville, it decided to go dead. I realized that I wasn’t hearing the fuel pump running. Apparently it started back up and we started home when it went out again. Fortunately, we were on a down hill slope and were able to coast into a parking lot. On the theory that the pump was defective and overheated, we waited 10-
It restarted and we were able to drive back home.
Having regretted getting the external fuel pump that came in the kit because of the noise and also being concerned that the pump was defective, I decided to replace the external pump with an internal one. Of course Holley has such for the price of $315. I ordered it. I also noted that the fuel smell was still lingering, particularly strong in the trunk. I then called Tom (reluctantly) and told him I was still having a fuel leak problem and that I would also like to have the new fuel pump installed. I also told him that I was having a problem with the battery discharging in just a few days. One week and $800 later, I picked the Mustang up. Tom’s man informed me that I had a major electrical problem. He described it that the body of the car was energized at 12 volts. I never understood what he meant nor how such could happen since the body was grounded to the battery ground. At this point, I forked over my money and got the hell out of there. Driving home I discovered that my turn signal dash indicators didn't work, my radio didn't work and the temperature sending unit didn't work. I still wonder to this day not only why the "guru" didn't fix the “energized” problem, but also left me with all new problems. Perhaps his reputation exceeds ability? On the positive side, he found and fixed the fuel leak. (Turns out the fuel return line wasn’t sealed properly.) But I also discovered later that the driver’s side rear window had mysteriously jumped the track. I’ll not be going back to Tom’s Auto Hell.
At this point, I called Glenn, who had originally done the rewiring (see Item 4 above). Though busy, he agreed to take on the “major” electrical problem as well as the other problems that had popped up. He had it a couple of weeks (he had done me a favor working on it at night between his other projects.) Turns out the “major” electrical problem was a stuck glove box switch that kept the glove box light on. The other problems were minor and he corrected them. (I’m still wondering how the turn signal lights got plugged into the wrong holes in the panel.)
This left two problems that needed resolving. It had suffered from a high idle setting since I got it back from Tom’s. It was hovering around 1000-
The remaining problem was one that had plagued me since the original installation. It was suffering from what I have come to learn is “aggressive tip in”.
When accelerating from stop or when depressing the accelerator while coasting, the throttle would seem to stick and then the car would lurch. Truthfully, I considered pulling the EFI and replacing the carburetor because of this. I asked a Holley tech about this months ago. He seemed rather stumped. I raised this again to a Holley tech just a few weeks ago. He suggested a change in one of the settings through the handheld. (I forget which one, but it didn’t work anyway.) If that didn’t work, he suggested I install a Throttle Extension, a short metal bracket complete with 3 bolts, lock washers and nuts ($13 from Holley or $20 from Amazon, but with free 2 day delivery and free return). This bracket bolts directly to the throttle lever “increasing the mechanical advantage of your throttle cable, or rod. Resulting in a significantly decreased pedal effort, and smoother pedal feel, especially at tip-With the EFI properly set up and with the addition of the throttle extension, the Mustang now runs better than anytime since I have had it. I can let the clutch out on a hill to hold the position without having to “heel” the accelerator. If I tried this with the carburetor, I had a 50/50 chance of stalling. The bottom line -
Now for the Mistakes:
- Mistake #1 -
Buying the EFI Master Kit. It turned out that the external mounted fuel pump was quite loud. Also, it required the replacement of the fuel line. The in- tank modules even says that you can reuse the existing fuel hard line and even states “no separate return line is required because this module returns excess fuel right inside the tank!” I’m not sure how this later is accomplished, but if true it could reduce the complexity of the project by eliminated fuel and return line installation. (I suggest that you verify this with Holley before proceeding on my assumption.) - Mistake #2 -
Mechanic. You really should find someone who has real experience with EFI installation. Duh! - Mistake #3 -
Replacing entire ignition system! I found a YouTube video that suggested that RFI problems could be eliminated by changing the distributor cap, replacing plug wires with resistor wires, replacing plugs with resistor plugs and liberal application of dielectric grease. Had I known, I would have tried this and retained as much originality as possible. - Mistake #4 -
Tom’s Auto Hell. I had to pay twice to finally get the fuel leak solved and the so- called electric guru left my car in worse condition than he got it.
